DeEnti Dip Kit

SKU: P70001

$95.00

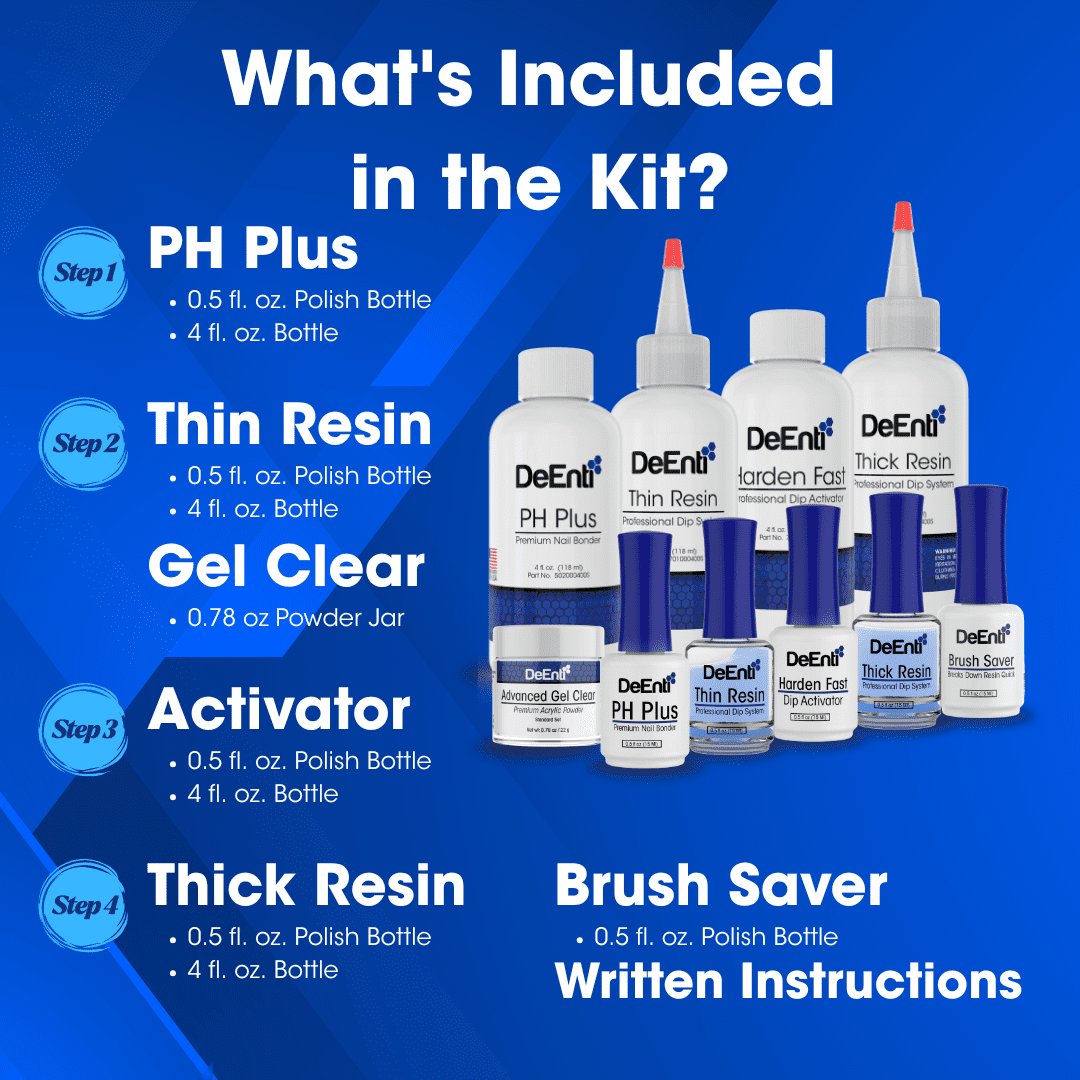
Our Dip Kit has been specifically designed to cater to the needs of individual nail technicians or those who are just starting out with dip powder systems. We understand the importance of having the right tools and guidance when learning a new technique, which is why we’ve carefully curated this kit. The kit conveniently includes the following items to get you started:

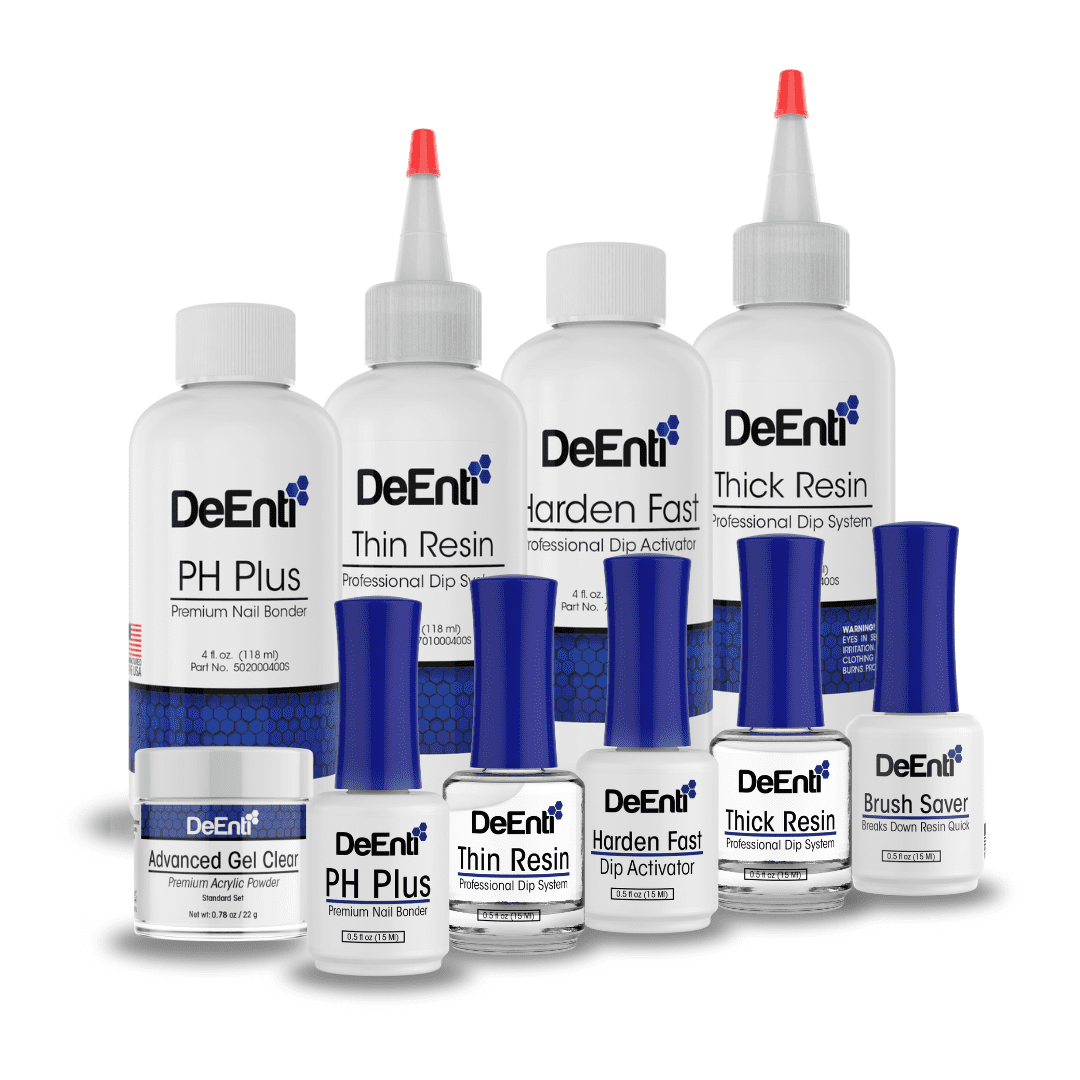
* 1/2 fl. oz. PH Plus, 1/2 oz. Thin Resin, 1/2 fl. oz. Harden Fast Activator, 1/2 oz. Thick Resin, 1/2 fl. oz. Brush Saver, 1 fl. oz. Clear Powder, 4 fl. oz. PH Plus, 4 oz. Thin Resin, 4 fl. oz. Harden Fast Activator, 4 oz. Thick Resin, 4 Pour Spouts
* Written Instructions: A step-by-step guide to help you understand and master the dip powder application process.

  • Smooth Application
  • Powder Liquid Set
  • Strong Hold
  • Professional Grade
Quantity
Images of DeEnti Free Gift options. Says Choose your free gift!

Spend at least $100 and get a free gift!

>> Learn More <<

Free Gift

To express our sincerest gratitude for your loyal business, we enjoy giving free gifts. It does not need to be a holiday or special occasion to qualify. Simply place your order and your free gift will automatically be added to your cart at no extra cost to you. Gifts vary by total amount spent. Free gifts change regularly, so please check back when placing another order.
  • DeEnti Dip Kit
    Spend $250.00
  • DeEnti Dip Kit
    Spend $550.00
  • DeEnti Dip Kit
    Spend $1000.00

More Information

Instructions

Dip Powder Application Steps
1. Apply a thin coat of PH Plus Bonder.
2. Apply a thin layer of either Thin or Medium Resin. Ensure you carefully wipe away any resin that gets on your clients’ skin.
3. With the lid still secured, shake the Powder jar to fluff the powder.
4. Create a protective base layer using Adv Gel Clear Powder to prevent any pigment staining on the nail bed. Dip the wet nail directly into the freshly fluffed dip powder.
5. Gently tap the bottom of the finger to remove any excess powder. Repeat this process on all nails. Then, use a fluffy brush to wipe off any excess powder from the nails and surrounding skin.
6. Repeat steps 2-4 with your desired colored powder 2-3 times until you achieve the desired coverage.
7. Once the color is applied, use a small amount of Harden Fast Dip Activator over the top of the powder.
8. Buff and file the nails to your desired shape and length.
9. Apply a thin, smooth layer of Medium or Thick Dip Resin. Allow it to air dry naturally, without using the activator. This should take approximately 4-5 minutes to cure, resulting in a shiny finish.
10. To finish, moisturize hands with Massage Butter, wipe down the nails with a lint-free wipe, and apply Cuticle Oil to nourish the cuticles and nail bed.

Remove Dip nails:

1. To start, gently remove the top layer of the dipped nails using a file or a drill. This improves the acetone’s effectiveness, allowing it to penetrate deeper.
2. Next, you have two options:

* Apply cotton balls soaked in 100% acetone to the nail and wrap with aluminum foil. After 10-15 minutes, remove the wraps.
* Alternatively, soak nails in 100% acetone for 10-15 minutes.
3. Then, slowly remove the acrylic using a cotton ball soaked in 100% acetone. If needed, use an orangewood stick to help.
4. Gently file or lightly drill over the natural nail to remove any remaining color.
5. Finally, any staining should fade within a few hours. This is often seen when changing from a heavily pigmented dark powder to a much lighter one.

Pro Tips

  • Hold 1
  • Hold 2
  • Hold 3
  • Hold 4
  • Hold 5


  • Size:

    0.5 fl. oz., Each

  • Viscocity:

    Medium, Thick, Thin

  • Step #:

    Step 1, Step 2, Step 3, Step 4

  • Kit:

    Kit

  • Features:

    Cruelty Free, Made in USA

PH Plus: Ethyl Acetate, Ammonium Hydroxide

Resin: Cyanoacrylate

Activator: Ethyl Acetate, Eimethyl Para Toluidine, Vanilla Fragrance Oil, Acetone, Isopropyl

Brush Saver: Nitroethane

Powder: Benzoyl Peroxide, Acrylates Copolymer, Silica Silylate, Proprietary Pigment Blend

Instructions

Dip Powder Application Steps
1. Apply a thin coat of PH Plus Bonder.
2. Apply a thin layer of either Thin or Medium Resin. Ensure you carefully wipe away any resin that gets on your clients’ skin.
3. With the lid still secured, shake the Powder jar to fluff the powder.
4. Create a protective base layer using Adv Gel Clear Powder to prevent any pigment staining on the nail bed. Dip the wet nail directly into the freshly fluffed dip powder.
5. Gently tap the bottom of the finger to remove any excess powder. Repeat this process on all nails. Then, use a fluffy brush to wipe off any excess powder from the nails and surrounding skin.
6. Repeat steps 2-4 with your desired colored powder 2-3 times until you achieve the desired coverage.
7. Once the color is applied, use a small amount of Harden Fast Dip Activator over the top of the powder.
8. Buff and file the nails to your desired shape and length.
9. Apply a thin, smooth layer of Medium or Thick Dip Resin. Allow it to air dry naturally, without using the activator. This should take approximately 4-5 minutes to cure, resulting in a shiny finish.
10. To finish, moisturize hands with Massage Butter, wipe down the nails with a lint-free wipe, and apply Cuticle Oil to nourish the cuticles and nail bed.

Remove Dip nails:

1. To start, gently remove the top layer of the dipped nails using a file or a drill. This improves the acetone’s effectiveness, allowing it to penetrate deeper.
2. Next, you have two options:

* Apply cotton balls soaked in 100% acetone to the nail and wrap with aluminum foil. After 10-15 minutes, remove the wraps.
* Alternatively, soak nails in 100% acetone for 10-15 minutes.
3. Then, slowly remove the acrylic using a cotton ball soaked in 100% acetone. If needed, use an orangewood stick to help.
4. Gently file or lightly drill over the natural nail to remove any remaining color.
5. Finally, any staining should fade within a few hours. This is often seen when changing from a heavily pigmented dark powder to a much lighter one.

Pro Tips

  • Hold 1
  • Hold 2
  • Hold 3
  • Hold 4
  • Hold 5


We’re excited to introduce our Dip Kit, specifically designed for individual nail technicians and those new to dip powder systems. We recognize how crucial having the correct tools and clear guidance is when learning a new nail technique, and that’s why we’ve thoughtfully put together this kit. For your convenience, the kit includes everything you need to get started:

  • Written Instructions. A step-by-step guide to help you understand and successfully apply dip powder.
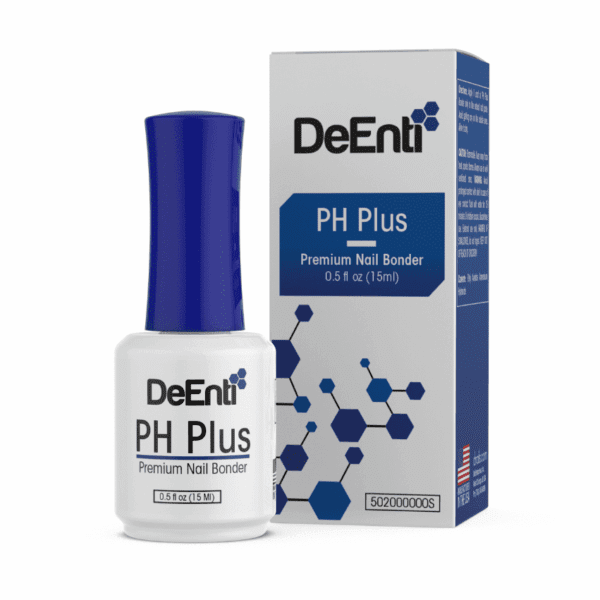
  • PH Plus (1/2 fl. oz. & 4 fl. oz.). Essential for preparing the natural nail to ensure optimal adhesion. Learn more about Nail Bonder here.
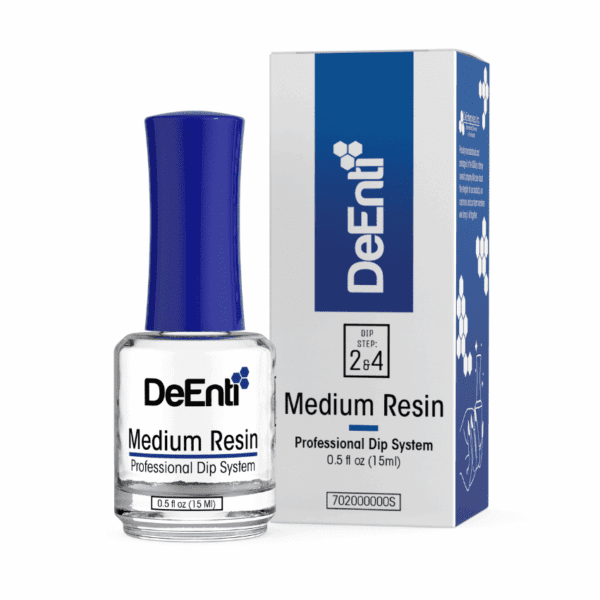
  • Thin Resin (1/2 fl. oz. & 4 fl. oz.). Used during application to create a smooth foundational layer. Learn more about Resin here.
  • Harden Fast Activator (1/2 fl. oz. & 4 fl. oz.). Helps to quickly cure and harden the dip powder. Learn more about Activator here.
  • Thick Resin (1/2 fl. oz. & 4 fl. oz.). Ideal for building nail structure and adding strength. Learn more about Resin here.
  • Brush Saver (1/2 fl. oz.). To keep your application brushes clean and in excellent condition. Learn more about Brush Saver here.
  • Clear Powder (1 fl. oz.). A versatile powder that can be used on its own or as a base or overlay. Learn more about Acrylic Nail Powder here.
  • Pour Spouts (4). To assist with the precise and clean dispensing of the dip powders.